Friday, February 8, 2013
Snow Day: Photo Friday
“I love you because no two snowflakes are alike, and it is possible, if you stand tippy-toe, to walk between the raindrops. ” ― Nikki Giovanni
I'm starting something new y'all! Sprinkled With Flour is getting personal...you know...all my deepest darkest secrets and all (not really, I'm kind of a boring person in the secret department.)
Now, as much as I love sharing recipes and pics of the goodies I devour, I also have a lot of non-food related ramblings going on in my head (a scary place).
So, since I already had this little corner of the web dedicated to photography, and I've got all those weird ramblings going on in my (sometimes scary) head, I thought this was the perfect place to share my photos and non-food related posts. Let's call this one Photo Friday shall we?
We woke up to several inches of snow last week...the first "real" snow we've had. The kiddo had a blast. Me? Eh-not so much. Unless you count sitting on an ice-cold step, the wind slapping the crap outta my face while the little guy keeps yelling, "Hey Mom! Look at me!
When they handed that wiggly, messy bundle of baby to me in the hospital, they never told me the crazy things I'd eventually do for the kid. Like freeze my butt off so he could play in the snow. It was worth it though - after all...he is kinda sorta cute and all. :) Enjoy your weekend!
When they handed that wiggly, messy bundle of baby to me in the hospital, they never told me the crazy things I'd eventually do for the kid. Like freeze my butt off so he could play in the snow. It was worth it though - after all...he is kinda sorta cute and all. :) Enjoy your weekend!
Amber
Wednesday, January 30, 2013
Before and After: Browned Butter Pecan Shortbread
I love makeovers don't you? I bet you never thought a photograph could get a makeover, but that's exactly what I'm going to show you today. Back when I first started this blog, it was purely as a way to chronicle recipes that I wanted to try, and to have something that showed my progress along the way.
I never imagined it would re-spark a love for photography that I'd always had but never did anything about. As I look back on my first few recipes, I cringe at those photos but I know that every journey had to start somewhere.
I just wish at the beginning of that journey I knew what the heck white balance was. Seriously, food is not supposed to be blue my friends...unless you happen to be eating a blueberry, or these Blue Velvet Cupcakes, or blue cotton candy...you get the idea.
I purposely kept those ugly images up because I wanted a reminder of where I started at. I've decided to go ahead and update my old photos with new ones, but instead of the old picture being dumped (rightly so) into the recycle bin, I'm going to turn it into a Before & After post. If you're just starting out in the food blogging world, and get discouraged looking at other bloggers food photos, maybe these posts will help you see that everyone started somewhere.
Even if somewhere was ugly blue food. :)
Here's the before shot of my Browned Butter Pecan Shortbread.
O.K. here's where I'm going to completely trash my own photo. Don't worry - I'm a pro - I've gotten enough rejection emails from Foodgawker that I can handle it.
1. THIS COOKIE IS BLUE
Obviously. Food is not supposed to be blue. Unless it's the aforementioned blueberries...or cotton candy. If you don't already know about white balance, find your camera's user manual and learn how to set a proper white balance in camera. This does not mean Auto White Balance. To get the most accurate white balance, you should set a custom white balance using a grey card, or if you're camera has the option you can set the Kelvin number to somewhere between 5000 and 6000. If you don't want to mess with setting your white balance in camera, you can also adjust it in your editing program. Most editing software has the option to adjust the WB to a more natural color.
Obviously. Food is not supposed to be blue. Unless it's the aforementioned blueberries...or cotton candy. If you don't already know about white balance, find your camera's user manual and learn how to set a proper white balance in camera. This does not mean Auto White Balance. To get the most accurate white balance, you should set a custom white balance using a grey card, or if you're camera has the option you can set the Kelvin number to somewhere between 5000 and 6000. If you don't want to mess with setting your white balance in camera, you can also adjust it in your editing program. Most editing software has the option to adjust the WB to a more natural color.
2. CAN YOU SAY "BACK UP?"
Seriously, getting in close for a detail shot is alright but when you start to loose the ability to tell what's in the picture, you're too close. The same goes for cropping your pictures, leave a little room to breahe...trust me...your food will thank you. :)
Seriously, getting in close for a detail shot is alright but when you start to loose the ability to tell what's in the picture, you're too close. The same goes for cropping your pictures, leave a little room to breahe...trust me...your food will thank you. :)
3. TOO DARK
This image is underexposed AND overexposed, making the left side of the image too dark and the right side too bright. This easily happens when shooting a side lit image (when you're light source is coming from the side of your subject.) To fix this, you need use something to reflect some light back onto the shadowed side of the image. I like to use a white foam board or reflector to open up shadows. To prevent overexposed areas, you can either move the plate further away from the light - so it's less harsh, or use something to diffuse the light (make the light softer and not so harsh). I have sheer white curtains hanging from my kitchen patio door. These work great for diffusing the light when it's too harsh.
This image is underexposed AND overexposed, making the left side of the image too dark and the right side too bright. This easily happens when shooting a side lit image (when you're light source is coming from the side of your subject.) To fix this, you need use something to reflect some light back onto the shadowed side of the image. I like to use a white foam board or reflector to open up shadows. To prevent overexposed areas, you can either move the plate further away from the light - so it's less harsh, or use something to diffuse the light (make the light softer and not so harsh). I have sheer white curtains hanging from my kitchen patio door. These work great for diffusing the light when it's too harsh.
4. BAD COMPOSITION
The crop is part of the bad composition, but a little planning and food styling/arrangement does wonders. This subject is too broad to cover now, but when you're looking through your viewfinder really look at the image before you snap the shutter. Is your picture crooked? Is there enough room to crop if needed? I'm still guilty of not paying close enough attention to the composition before I snap the shot.
The crop is part of the bad composition, but a little planning and food styling/arrangement does wonders. This subject is too broad to cover now, but when you're looking through your viewfinder really look at the image before you snap the shutter. Is your picture crooked? Is there enough room to crop if needed? I'm still guilty of not paying close enough attention to the composition before I snap the shot.
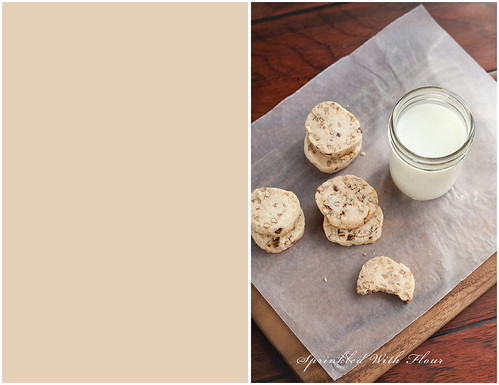
Now for the AFTER shots:
 |
There you have it. How I went from glowing blue cookies to something a little more edible looking. If there is enough interest I will do more food photography posts, diving into more detail on photography tips and tricks, and showing you how I like to get the shots for my posts. What do you think? Let me know in the comments below. :)
You can find the recipe for these cookies in my original post Browned Butter Pecan Shortbread. Enjoy!
Have a great day!
Amber
|
Subscribe to:
Comments (Atom)


